
Stress. Relief mixed with guilt. Gratitude. Sorrow. And the urgent desire to HELP. These were the emotions running through me, after having survived Hurricane Harvey in Texas with no damage to my own home.
I asked myself, What can I do to help those who have lost everything? What can MY FAMILY do? As sad and devastating this event is, we were given the humbling opportunity to help those in need and to teach our kids to love and serve others.
If you are trying to think of ways your family can help people in need, one opportunity that has a huge impact but is perfect for families is to hold a food drive in your neighborhood. Sound hard? It’s not as hard as it seems. Let me show you how to hold a food drive in your neighborhood just like we did in ours. It took about four hours total, including the planning, executing, and delivering. You can scale it down or up, according to your family’s abilities and how much outside help you get.
Before Harvey’s worst rains hit, I decided to take my little ones and evacuate. My husband Tim and older kids decided to stay in case they needed to start sandbagging and moving furniture and carpet. When the threat was over and it was safe for us to come home, I felt an urgent need to come back and find ways for our family to help the thousands suffering in our area. After unpacking, I did a little research online for ways our family could help. This was the little spreadsheet I came up with:
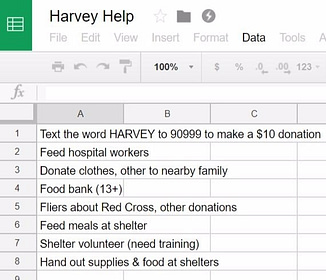 We then gathered our family for an informal family meeting. I read off my list of ideas and asked if anyone else had ideas. Everyone thought these ideas were good. I asked each person what they liked best and put their name next to that idea.
It became clear that passing out fliers and holding a donation drive was the top choice. We’ve done it before for our son’s Eagle Scout project (he held a book drive), and the boys have passed out fliers for scout fundraisers many times, so this was something we were all familiar and comfortable with. Not only that, it was something even the little ones could help with. And it was a way we could leverage our effort by getting the community involved.
So, once we had our project chosen, here’s what we did – How to hold a food drive in 8 steps:
1. Choose an organization.
It seems like every kind of organization is frantically trying to help Harvey victims, so there should be plenty to choose from. I found a flier a local event center had shared about collecting donations for the county food bank, and we realized the food bank was the organization to team up with.
We’ve volunteered at the food bank before, and it’s amazing to see the organization and operation of the place. They have donations pouring in all the time, and volunteers sort the donations and send them off to the places and people that are most in need. In my opinion, it’s the best place to take your donations to. A lot of the places and organizations that accept donations end up taking those donations to the food bank, so it made sense to take our donations directly there. Skip the middle man and save a lot of time and effort.
2. Contact the organization.
I wasn’t sure if I would be able to get a hold of the food bank because of the chaos and closures in our area, but the receptionist answered the phone on my first try. I explained to her that our family wanted to hold a donation drive in our neighborhood to help Harvey victims, and I asked her if that was okay. She was very easygoing and said that yes, of course we could.
I then asked about details: where to drop off the donations (she told me to bring them directly to the food bank), what donations they needed (I verified the list I found on another flier). You would also need to know the hours of operation. Since we were going to volunteer there the following afternoon, I didn’t need to ask about that. It was so easy to get permission and the information I needed! If you can’t get a hold of the food bank over the phone, go over there in person if possible. You definitely want to make sure that you’re collecting supplies and food that are actually needed.
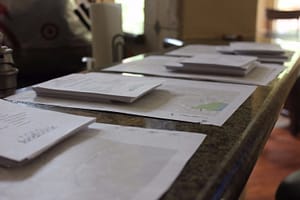
3. Make a flier.
Once you get permission and know exactly what donations are needed, it’s time to make the flier. We’re big Google fans, so we made a Google doc. Make sure you include:
- When and where they need to have their donations ready
- Contact phone number
- List of specific items needed
- The organization that you are donating to

After we got it looking good, we duplicated it so there were four identical one-page fliers in one file. We then saved it as a PDF and opened the it in Adobe Acrobat Reader DC and adjusted the print settings so we could print four fliers per page. I say “we”, but really Tim had to take over because he’s the computer pro.

4. Decide on your target area, and estimate the number of fliers needed.
We decided to cover our entire neighborhood, and my husband estimated we would need about 800 fliers. Well, he overestimated a little. Actually, a lot. We only needed about 550. You can look on Google maps at your neighborhood, take a small section and count the number of houses in that section, then estimate how many sections are in your area and multiply that out. So if you count thirty houses in one section and there are about four sections, multiply 30 x 4, and you have about 120 houses to cover.
5. Prep the fliers and routes.
Now that you know how many fliers you need, print out the flier PDF and cut the pages into fourths. We started stapling rubber bands to the corners of the fliers, then after about ten fliers decided it wasn’t worth the time and effort. We decided it would be fine to slide the quarter-page fliers into the door cracks. Never use tape! It can peel off the door paint (I’m still unhappy with the solicitor who did that on our front door).
 Tim figured out our routes and printed out maps for each route. Our neighborhood is divided nicely into little sections, so it was easy to divide it up.
We also had to figure out teams. A couple other families volunteered to help, so we had enough people to cover the entire neighborhood.
You have to make sure you keep track of which streets you cover, especially if you’re not doing the whole neighborhood. It might be wise to highlight the streets on each route so it’s clear what streets to cover.
6. Race to pass out the fliers!
I had the little girls with me, so we didn’t go incredibly fast, but we actually passed out more fliers than I thought we would. Both girls enjoyed the work, and I had the stroller for when they got tired. I was right there to help and keep an eye out for “stranger danger.” After the boys were done with their route, they came and helped us finish. It took us less than two hours total to pass out fliers to every house in the neighborhood, about 550 houses. We had five adults and nine kids helping.
7. Pick up the donations.
We picked up the donations the next day. I thought it best to do that because of the urgent needs of our area, and because people are so eager right after a disaster to do something to help. Several people called or texted to let me know they had donations, and they were grateful that we were coming to pick them up. Lots of people want to help Harvey victims, but they’re unable for one reason or another to deliver donations themselves.
I also posted in my church facebook group that they could bring donations to our house, and I got a great response. So before we even started picking up donations, our van was already halfway full.
So, we didn’t do the best job of planning out donation pickup. We didn’t realize just how generous our neighbors would be! Tim took one side of the neighborhood and I took the other. He had the girls and his little sedan, while I had the boys and the van.
Before Tim was through with his route, he had to drop off a load at home. A friend came by and offered to help (and thankfully he had a truck!), so his family covered part of the neighborhood.
The plan was, drive slowly down the street and see if there are any donations on the porches. If you don’t have a clear view of the porch, stop and have someone run up and check. Many people had put the donations on their driveways or in clear view of the street, so it was usually easy to know where to stop. The fun part was, the boys figuring out where to sit/stand after our van completely filled up. Thankfully we were on side streets, and the boys stood on the sides of the van with the doors open since we were going very slowly with our hazard lights on. Somehow we fit everything in the van.
We met back at home and decided to hook up the trailer (which we should have done in the beginning! If you don’t have a truck or trailer, see if you can enlist the help of friends. Or just make multiple trips to the donation center. We filled up the trailer and the van with donations! We were so amazed to see the generosity and kindness of our neighbors and friends. That’s the Texas spirit for you!

8. Deliver the donations and give yourselves a pat on the back!
The food bank was ready to accept our donations when we arrived. They had forklifts and volunteers ready at the delivery ramp. It was neat to see trucks and vans pulling in with their loads of donations. After unloading our donations, my husband, son, and his friend helped unload a huge U-Haul truck filled with donated supplies and food. We might not have brought in nearly as much as that big U-Haul, but the donations we delivered are sure to help those who need it most.
In our family mission statement, we included this important line: “We put others’ needs before our own and always do more than our share.” Our food drive for Harvey victims gave us an opportunity to practice what we preach.
Our thoughts and prayers go out to all those affected by the recent natural disasters.
This is just one of many ways to help neighbors in need. Another simple way is to volunteer at the food bank instead! There you will be inspecting, sorting, and possibly handing out donations. If your kids are at least 13 years old, they can usually volunteer with you.